Capturas e gravações de ecrã
Capture all or part of your screen as an image
Send it as a file or paste it from the clipboard
Save a video of your screen activity
Pode captura uma imagem da suo ecrã (uma captura de ecrã) ou grava um vídeo do que está acontecendo no ecrã (uma gravação de ecrã). Isso é útil se deseja mostrar a alguém como fazer algo o computador, por exemplo. Capturas e gravações de ecrã são ficheiros de imagem e vídeo normais, então pode enviá-los por e-mail e compartilhá-los na web.
Capturar uma imagem do ecrã
Press the Print key or launch Take a Screenshot from the Activities overview.
-
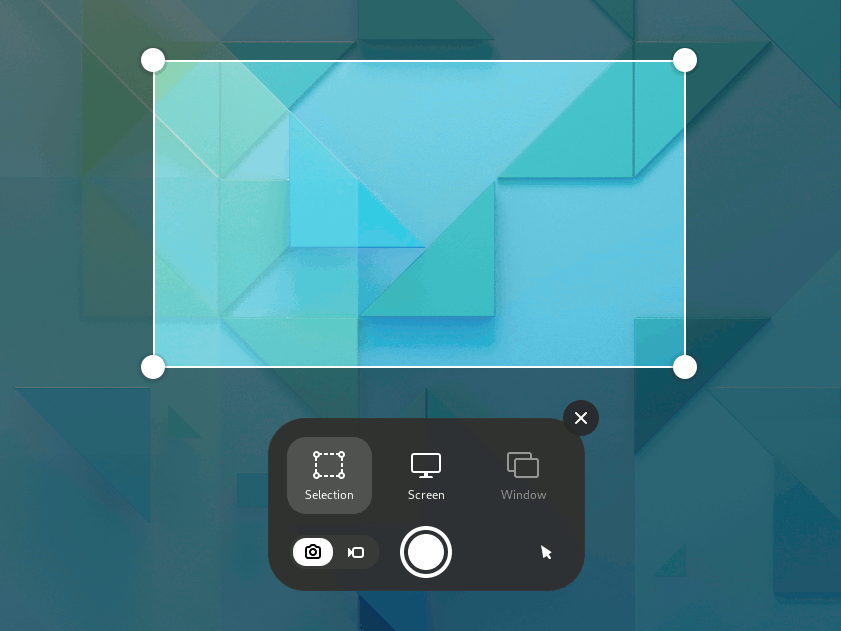
The screenshot overlay presents you with handles to select the area to capture, and
 indicates screenshot (still image) mode.
Click the pointer button to include the pointer in the screenshot.
Click and drag the area you want for the screenshot using the handles or the crosshair pointer.
To capture the selected area, click the big round button.
To capture the entire screen, click Screen and then click the big round button.
To capture a window, click Window. An overview of all the open windows is displayed with the active window checked. Click to choose a window and then click the big round button.
Where do they go?
A screenshot image is automatically saved in the Pictures/Screenshots folder in your home folder with a file name that begins with Screenshot and includes the date and time it was taken.
The image is also saved in the clipboard, so you can immediately paste it into an image-editing application or share it on social media.
A screencast video is automatically saved in your Videos/Screencasts folder in your home folder, with a file name that starts with Screencast and includes the date and time it was taken.
Realizar uma gravação de ecrã
Pode fazer uma gravação em vídeo do que está acontecendo em suo ecrã:
Press the Print key or launch Take a Screenshot from the Activities overview.
-
Click
 to switch to screencast mode.
Click the pointer button to include the pointer in the screencast.
Choose Selection or Screen. For Selection, click and drag the area you want for the screencast using the handles or the crosshair pointer.
-
Click the big round red button to start recording what is on your screen.
A red indicator is displayed in the top right corner of the screen when the recording is in progress, showing the elapsed seconds.
Once you have finished, click the red indicator
 in the top bar.
Atalhos de teclado
Within the screenshot feature, you can use these keyboard shortcuts:
S |
Select area |
C |
Capture screen |
W |
Capture window |
P |
Toggle between show and hide pointer |
V |
Toggle between screenshot and screencast |
Enter |
Capture, also activated by Space or Ctrl+C |
These shortcuts can be used to bypass the screenshot feature:
Alt+Print |
Capture the window that currently has focus |
Shift+Print |
Capture the entire screen |
Shift+Ctrl+Alt+R |
Start recording a screencast |